Category Archives: 3DS Max

Advance Painter plugin – 3DS Max


Advanced Painter is a free alternative to other commercial plugins like Forest Pack or MultiScatter for scattering objects on surfaces. It doesn’t have so many options to scatter objects, but similar to MutiScatter it allow to drop objects on surface of other objects. This action resemble painting.

paints10

To install the plugin start Max, then go to MaxScript>Run Script … and choose the extracted file advpainter_1.6.0.mzp. A dialog box will inform you that installation is successful.
You may need to be logged as an administrator of your computer.
(I’ve also “Run as administrator” 3DS Max )

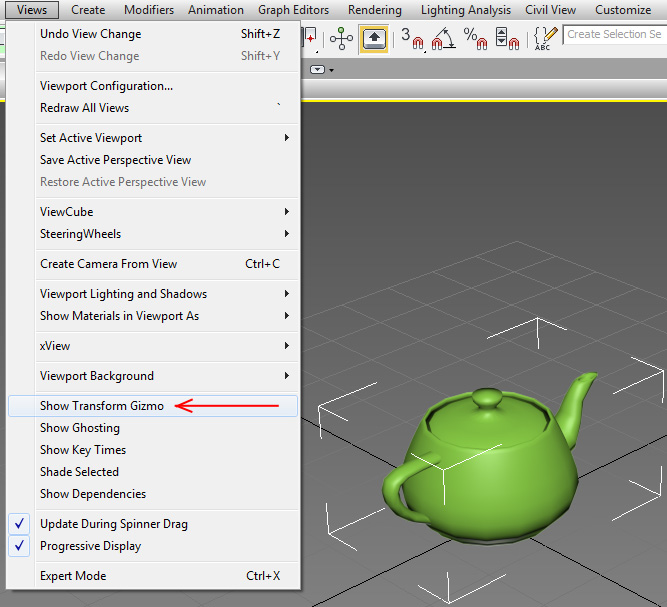
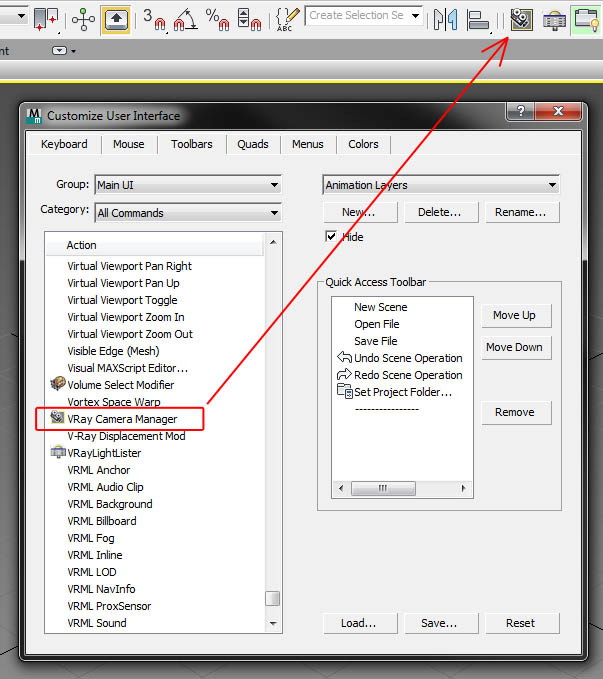
You can also create Advanced Painter shortcut icon to your toolbar (main menu bar, or quadmenu). The video below can help you to install Advanced Painter and help familiarise with its futures. (The way of installing it using drag and drop technique didn’t work for me)

New version for download is possible here: AdvPainter v1.6.0(x32/x64)
You can also try to install this version: advpainter_1.6.0_max2013.mzp  for 3DS Max 2013 up [only]. It works fine with my 3DS Max 2014.

You can also learn how to use this plugin from tutorials e.g.
at CGWORKSHOP or here.

Advanced Painter Icons – here you can download icons I have quickly created for this plugin. You can check here how to install them.

3DS Max – Orthographic render with VRay Camera

Small script allows to set up an orthographic VRay camera in the scene.

You can download it from here: VRay Orthographic Rendering Camera Rig

You just need to set it up once. The script doesn’t need to be loaded/running to render the view later or even on the different machine.

To make a top view just rotate the camera. It is possible to adjust position of the camera (with the rig) and its parameters (focal length and film width) without the script interface.

I needed it to render sections/elevations of a hotel room in my work. It worked fine. Camera cuts the model in the place where is here center (origin).

The viewport doesn’t show orthographic view. The scope of the render needs to be tested.

Here is a quick render I made with this script.Room elevation


3DS Max – Missing Transform Gizmo?!!

Have ever your Transform Gizmo disappeared?
Here is the solution to this very simple but annoying problem.

1. Hit ‘x‘ on the keyboard.
Transform-Gizmo-BIG

Additionally ‘+‘ and ‘‘ keys (not on the Num Pad) re-size the gizmo.

It’s also worth knowing that you can toggle on/off the white “Selection brackets” shown above by pressing the ‘J‘ keyboard shortcut.

2. Go to the main 3DS Max Options window under Gizmos tab.
It’s the same option triggered by “x“.
gizmo options

3. When the Gizmo is completely missing check in the menu:
View > Show Transform Gizmo
Show Transform Gizmo


3DS Max – Vray Camera Manager

Hello everyone,

I was recently really busy working on some visuals for Hilton Hotels and because I was using 3DS Max and VRay hence I have a new idea for the post to share with you.

I would like to encourage you to install a VRay Camera Manager. Similarly as a Light Lister it will give you an icon/button which opens an easy to manage list with all VRay cameras.

To install that script vcm.mcr just drop and drop it to the 3DS Max window or Run it from the MAXScript menu. Apparently nothing will happen but a new position named VRay Camera Manager will be added to a list of available commands in the Customize User Interface window on the Toolbar tab. You can drag and drop this command to any of your open toolbars.Vray camera manager

Version Requirement: 

Tested in in Max 2012, 2013, 2014 but should work in earlier versions

Other Software Required:

VRay 2.0 or higher

3DS Max – Isolate Selection

Isolate selection in another program – 3DS Max. How it works?

There is a keyboard shortcut: Alt+Q = Isolate selection

In 3DS Max 2012 and previous versions while the Isolate Tool is active, a dialog labeled ISOLATED SELECTION appears.

Exit Isolation Click to end isolation, close the dialog, and unhide the rest of the scene. The views are restored to what they showed before you chose Isolate Selection.

In 3DS Max 2013  the “isolate selection” was changed. Alt+Q toggles the isolation. Dialog window doesn’t appear and it’s impossible to use isolate selection one after another to get deeper in complex models with many objects how it was possible before.  There is also icon on the bottom of the viewports which do the same as a keyboard shortcut.

isolate selection

In 3DS Max 2014 as I heard the possibility to use isolate selection one after another was restored.


Note: Isolate Selection works only at the object level. You can’t choose it while at the sub-object level. If you go to a sub-object level while working with an isolated object, you can click Exit Isolation, but you can’t isolate sub-objects.


3DS Max – How to create Maxscript toolbar button?

My last 3DS Max post about CG Source Floor Generator script generated another question: How to create a toolbar button for any script?
Instead of mulltiple clicks: Maxscript–>Run Script–> and choosing .ms; mcr files from the folder it’s more convenient to create UI button to run specific script directly. And it’s easy!!!

  1. Open the script Maxscript–>Open,
  2. Highlight all of the code (Ctrl-A) then
  3. Click drag it to a UI bar you want it to appear on.

This procedure will make a generic button at that spot in the UI that will activate the highlighted code whenever you click on it. Right clicking on the button allows you to modify it’s appearance. You can choose any icon from a list of max toolbar icon or create your own icons.

script button


How to create your own max icon?

You need to create 24×24 pixel icon image and 16×15 pixel icon image (width x height) with a specific names as shown below and save them as Bitmap image (*.BMP)

It’s advisable to also create alpha channel images for these icons in the same size and format. White color for non transparent pixels.

[Icon’s Name] + _24i.bmp
[Icon’s Alpha Name] + _24a.bmp

[Icon’s Name] + _16i.bmp
[Icon’s Alpha Name] + _16a.bmp

New icon need to be copied to the folder specified in Additional Icons system path Customize–>Configure System Paths…

In Windows 7 it is:
C:\Users\user_name\AppData\Local\Autodesk\3dsMaxDesign\2013 – 64bit\ENU\usericons

CG FloorGenerator Icons – here you can download icons created by me for Floor Generator and Unique Material ID scripts.

And a video tutorial by Daniel Dye explaining how to create custom max icons:

And tutorial by


Buttons and Toolbar: TIPS

  • To create a copy of a button press, ctrl and drag the button that you want to copy. It will create a copy of the button. You can also copy buttons from one toolbar to another using the same trick. It will work only if option Lock UI Layout (ALT + 0) under Customize menu is turned off.
  • To delete a button, press ALT and drag the button you want to delete. It will work only if option Lock UI Layout (ALT + 0) under Customize menu is turned off.
  • To dock your toolbar, just right click on it then Dock and choose the desire dock type (Top, Bottom, Left or Right).
  • If you want to delete your toolbar, just go to Customize > Customize User Interface… Now under Toolbars tab, just select the toolbar that you want to delete and click on Delete… button.

3DS Max – Floor Generator Plugins

Today I present something must have for all interior/exterior visualizers and not only.

CG Source released 3 plugins/scripts for 3DS Max up to version 2013:

  • FloorGenerator is a script for 3dsmax which generates floor objects consisting of individual boards which can easily be textured using MultiTexture.
  • MultiTexture Map is a plugin for 3dsmax that loads multiple textures and assigns them randomly, either by object or by material ID. With controls to randomly adjust the gamma, hue and saturation.
  • UniqueMaterialID is a small script for 3dsmax to assign unique material ID to each element inside an object.

Here you can find detailed tutorial by Bertrand Benoit about Using Floor Generator Script .

From Here you can download some free sets of textures to use with the Floor Generator kindly shared by Mário Nogueira.

floor generator